
Back in October of this year, my wife and I realized something startling. We don't have to buy the things we need or want - in some circumstances, we can build those things ourselves, saving money and time.
We'd been wanting a larger table (ours was bought at a thrift store three years ago for $40), but the prices for the tables we liked were a bit out of reach. Then Samantha spotted these do-it-yourself instructions for a beautiful farmhouse table, and asked me if I thought I could build it. And the rest ... is this blog post.
Why a blog? Well, the original poster (plus the commenters, questioners, and people who had blogged about their own attempts to build) made this possible. So I'll add my voice to the crowd, and hopefully help anyone else who wants to do the same!
Credit for the plans goes to the original poster, Tommy. Posthumous thanks also go to my grandfathers - in a way, the inheritance from each is what made this project.
And now, ladies and gentlemen and everyone else reading, the details!
The plans we found included the details for a table, bench, and two extensions. There are a couple of variations on the width and length, but we decided to make the table eight feet long, and 45" wide (using four 2x12's for the top). We also decided to build an extra bench.
We borrowed a truck to move all the lumber around! I bought the following materials to build the table, two benches, and two extensions:
2 x 12 - 4
2 x 8 - 8
2 x 6 - 1
2 x 4 - 12
4 x 4 - 5
Operating on the 'better safe' principle, I included an extra 2x4, 4x4, and 2x8. Before I started the build, I combed through and figured each cut that I wanted to make and how best to arrange them on the boards. Having the extra let me make mistakes (which I did) and still have enough lumber to keep going. I've already used the leftovers on other projects. We bought the boards from Milford Lumber (thanks Brad!), and paid around $235.00 for everything.

The first step for me was to cut the lumber to size for the bases. I laid everything out autopsy-style on the basement floor so I could keep track of everything and make sure all the dimensions are right - since I was following the plan for the first time, I needed to make sure! It took more time this way, but that was okay.
One other note on this - I wish I'd cut these just a bit long (1"?), then cut them again to the correct length, The 4x4's were just heavy enough that to tilt slightly as the chopsaw cut them, leaving them slightly angled.

One of the most time-consuming parts of this project was the notches on the table legs. For stability, the table has stretchers at each end running across the width of the table, and a single long stretcher running the length of the table. Notches are cut into stretchers and legs so they fit together and support each other.
To cut that, I set the fence on my table saw 3 1/2" away from the closest edge of the blade, then set the blade to 1 1/2" high. I made a single cut on each of the twelve legs (bench and table), then adjusted the fence to 7 1/2" away from the farthest edge of the blade and repeated the process. Don't forget to test each setup on a scrap piece before you even think of touching your good pieces! Use a scrap piece of 2x4 to make sure that the width is right - you want this notch to be a tight fit, 1 1/2" deep and 3 1/2" across.

The next step was to run the blade through to take out the meat in the middle portion. I used the table saw to make multiple cuts through this section, but please note that this is dangerous if you're not careful. Only run the stock through in a single direction, and never take your eyes off the blade. Keep your fingers well away, and don't reach across the saw for any reason. You can save time or save your fingers, your choice. Using a dado blade might make this easier and take less time, if you have one.

Once you have the center portion cut into little pieces, you can snap them out with your hands and clean them up with a chisel, the saw, or some other tool. Don't forget to test the fit again using a scrap 2x4.

While doing the notches, I slipped (twice) and cut into the workpiece at the wrong spot. In retrospect, it would have been really smart for me to cut the notches for the table legs first, rather than the benches - as it played out, I happened to ruin a bench leg, cut a new bench leg, then ruin a table leg. If I'd had the 'ruined' table leg available, I could have cut it down for a backup bench leg when I needed it. Oh well. Notch the table legs first!
Using a similar process, I also cut notches in the end stretcher. The cuts are at the same depth, but done so that you have a 3 1/2" notch at each end of the stretcher, and a similar notch centered on the top. Using a 2x4 for this piece would save you the time of cutting out the two end notches, but I kinda like the thicker piece.
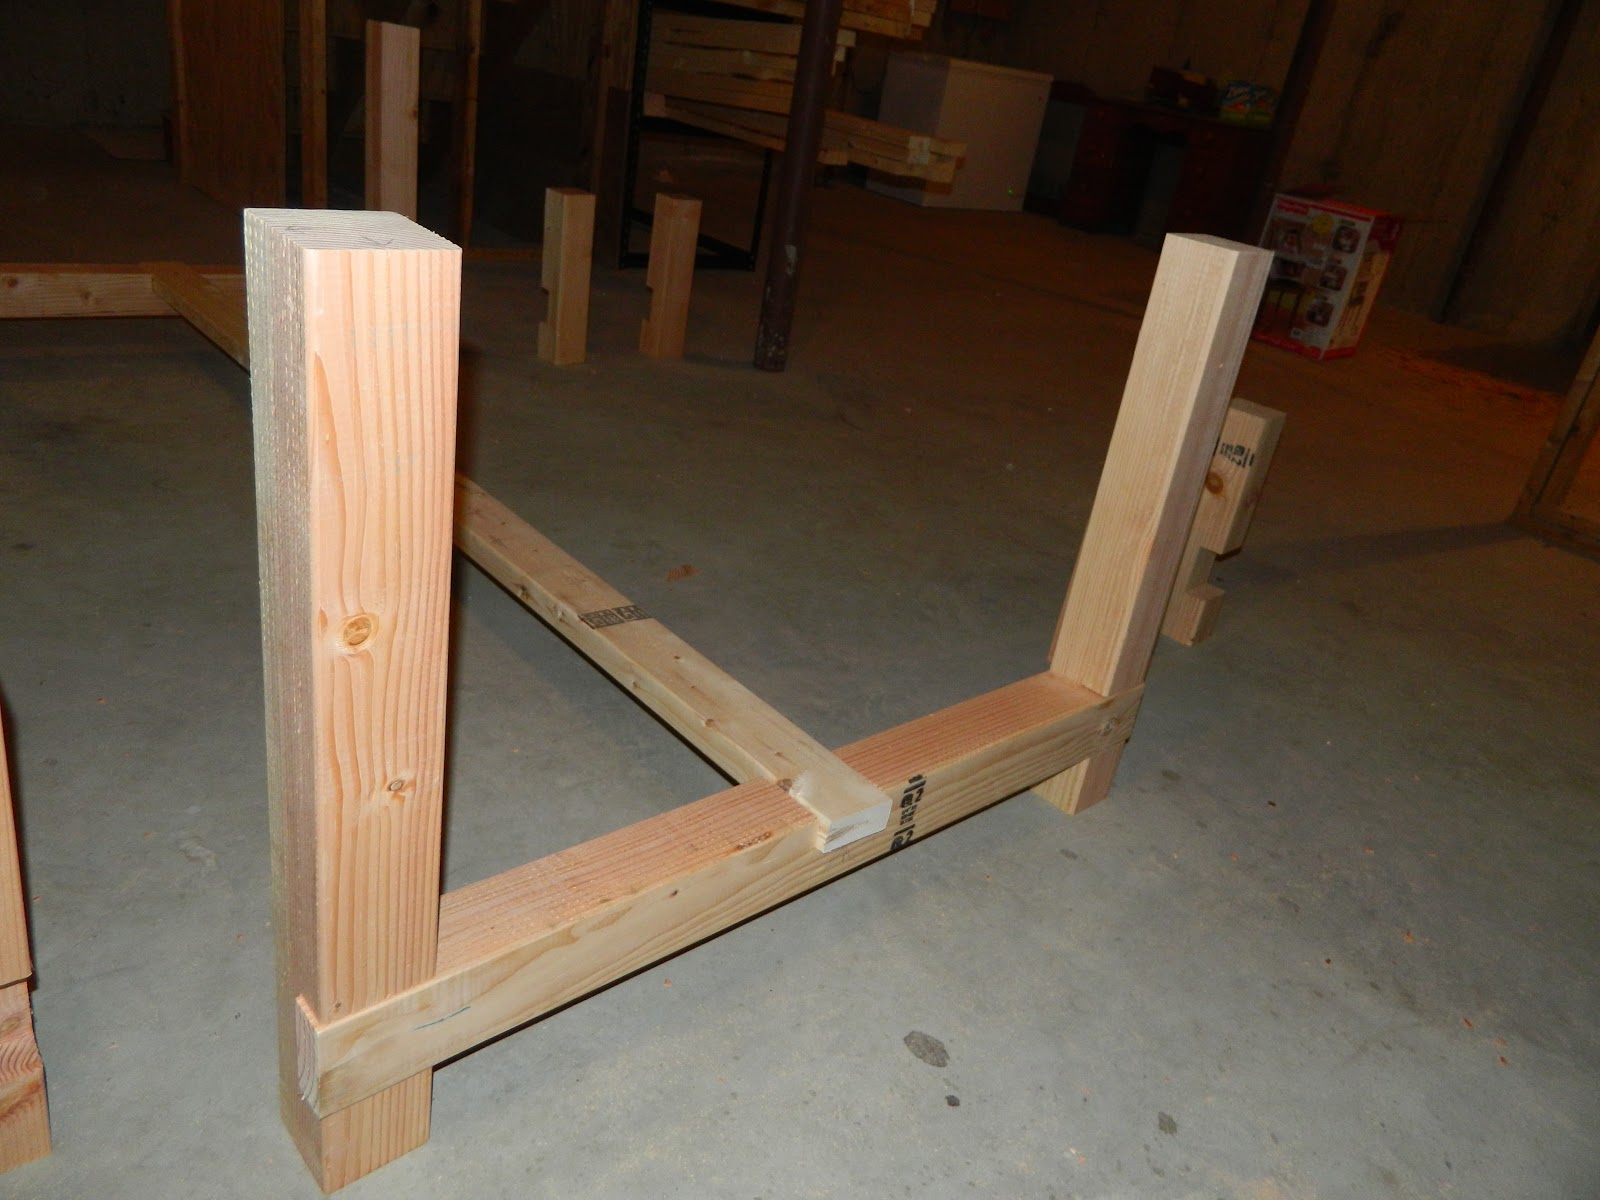
Once I was done with the notches, I laid out the legs again. Note that the stretcher at the end had a notch on top to accept the long stretcher down the middle.

Now that the bottom section of the base was done, I cut the boards for the top section. Four boards are laid out between the table legs forming a box, with an additional five boards on the inside (two firming up the ends, and three face-up holding the table top. Once again, I laid them out as I cut them so I could confirm the lengths.

This is probably a good spot to introduce the most versatile tool of the project. I used pocket holes to attach nearly everything on this table together (the only exception being the legs and stretchers, which are just holes drilled with a countersink bit). Everything else uses pocket holes, drilled out with a Kreg Jig. This saved me a ton of time and effort, and the plans over on the original post have everything laid out so none of the holes will be visible in the end. I bought the K4 benchtop jig (quickest way to drill 90% of the holes, comes with the bit, collar, and guides necessary) and the Mini jig (for pocket holes in odd places, like at the end of the 7 1/2' tabletop boards). You can find videos and pictures of how to use these on the Kreg site linked above. If you look at the picture above, you can see the pocket holes drilled into the end apron.
I started assembling the top framework of the base with the end aprons, then the side aprons, then the center supports. Each end of the table uses two 2x4 end aprons, one slightly narrower than the other stretching between the two posts, and the second snug against the back of the two posts. The picture below shows how all three aprons are connected to the post.
Leave a little bit of space between the two boards so you have room to work. These are going to support the extensions eventually.

Attaching the side aprons to the posts was hard to do by myself; I ended up supporting them with stacks of scrap wood while I maneuvered the pipe clamps in place and tightened them down in the correct position, then attached them using screws in the pocket holes already drilled. Once the outside pieces are set, attach the 2x4 supports in the center, flush to the top of the rails, with the wide side facing up. Glue, clamp, and screw these in place.

One final detail, and then the table base is complete! Even an eight foot table will be too short for some family gatherings, so I wanted to be able to extend the length of the table top. There are plans over on Tommy's site for these, and I really recommend that you build them as well. Once the base was fully assembled, I used my circular saw to cut out two notches in the end aprons, 1.5" deep and 1.5" wide. You can fiddle with the exact placement, but it's important that they be exactly equidistant from the center of the table. More on these when I get to the extensions.


With the table base complete, I turned my attention to the benches. These went together pretty easily, using similar construction as the table base. I should have taken more pictures, but got too absorbed in the project - these just use the four legs, four outside aprons, and then small blocks on the inside of the end aprons to provide some more support.


With both bench bases done, I next constructed the bench tops. I did these first, since I figured it was easier to fix a mistake on these (2x12's are more expensive than 2x8's, and I didn't have an extra one). The process was fairly simple, once you got down to it ...
First, you drill pocket holes in the underside of the boards (space these so that you alternate screws coming in from each board). Starting about 4" from the edge, I drilled a pocket hole every 24" - this left me with a screw coming from the top board at 4", another from the bottom board at 16", another from the top board at 28", etc.

Second, you apply glue to the edge of one board, then use every clamp in your workshop to squeeze them together until no space is between (no picture, sorry, but you can see the process in the tabletop pictures).
Third, you cut a breadboard (for the benches, this was a 2x6) to the exact width of your new bench top. Drill pocket holes in the end of the bench top and the breadboards, following a similar alternating pattern. Try to keep the pocket holes a little distance away from the edge of the boards - the tape measure is less important than common sense. Attach those together in the same manner.

With that out of the way, I decided to stop and have some fun! I used some random tools around the shop to create dents and dings in every exposed face of the bench. I didn't want a ton of damage, so I had to be careful not to get too enthusiastic, but even some of the deeper dents look good now. Do whatever you feel like - it's your table! Avoid recognizable patterns, and come at it from different angles and directions. The banging is quite therapeutic, actually.

For me, the next step was to sand everything down, especially the distress marks I'd just created. I used a random-orbit palm sander for this, which has a total sanding surface of about 4x5 inches. It took a long time, especially on the top surfaces, and I wish I'd had a belt sander before I did this project! This was probably the second most time consuming part - it felt like it took forever. Use some moderate sandpaper (100-grit or so) to take enough off to remove pencil or other marks, then sand with fine paper (220-grit) to make it nice and smooth. If you want to plane any of the edges, feel free - just remember that the sanding needs to be the last step.

Since I didn't have a router, I also used the sander to round down the edges and corners. I went through about a million sanding pads, but that's okay :) Part of the learning experience!

The table top was the part I was most nervous about, since it's the most visible part of the table, but eventually I ran out of other things to do first and started in on it. I laid out the boards on the floor (with some scrap 4x4s underneath to lift them up) and arranged them all to match each other. I was cutting about a foot off of the eight foot 2x12, so I was able to slide them around to control where the knots and grain patterns were, as well as any curves that might leave gaps between. Set this up so they fit as well as possible, then clamp them together and cut off one end straight using the circular saw.

I then drilled the pocket holes, using the same alternating pattern as the benches. The only real difference was that the two middle boards had holes drilled on both edges facing the boards on either side.

Attaching the table top was a matter of gluing, clamping, and screwing the long pieces together, then attaching the headboards at the end, just like the bench tops I'd practiced on.
To do this, I laid out the boards on a couple of scrap 2x4's, with the bottom side facing up. I then clamped a piece of scrap to the ends of the first board, so I could make sure the tops met evenly. Once the first piece was clamped, I glued the edge of the second piece, positioned it next to the first, and then clamped them lightly together using my bar clamps. Then I added more clamps to the end piece and slowly tightened all five clamps a half-turn at a time until I was satisfied (use scrap wood to prevent damage).
Once the clamping is as tight as you can make it, screw the two boards together using the pocket holes already drilled. I started from the middle and worked my way outward one screw at a time.

Once the screws are done, you can go ahead and release the clamps - the glue is going to dry fine, since the screws are what really holds it together. Keep adding boards one at a time until you're done.

I forgot to take pictures, but the next thing I did was to cut the other end of the table top straight with my circular saw, then attach the breadboards. Once that was done, the table top received a thorough sanding.

I'll freely admit to you that the finishing process was not my favorite part - designing and cutting and building are a lot more fun for me. So I'm pretty lacking on pictures for this part. I used 3" foam brushes to apply a coat of pre-stain wood conditioner (just on facing surfaces), then Special Walnut stain (two coats on the undersides, three coats on the base, and four coats on the tops), then urethane topcoat (three coats on bases, five coats on tops). I'm not sure I did it thickly enough, but we'll see how it holds up! Always check your work five minutes after to look for any drips! I laid down cardboard and painting cloths, but not enough - my cellar floor may never recover.


When everything was dry and ready, I attached the bench tops to the bases. I clamped scrap wood to the ends to center the length of the bench top, then used more clamps on the edges to center the width.

I then screwed the top on from the underside, using the pocket holes I'd already drilled in the aprons and also going straight up through the center supports. These guys are heavy!!!

I had to get help carrying the table base and top up and out the bulkhead and into the dining room - if the two pieces had already been attached I'm not sure we could have done it without damaging something. Once it was upstairs, I again used clamps and scrap to attach the top to the base (no pictures, sorry).
I also never took pictures of the extensions, but they're pretty simple. You can find details over on the other blog, but basically all I did was cut two 2x8's to match the width of the table and join them together. I put two long 2x2's into the notches previously cut in the table base, set the extension top on them, and screwed them in place. Once they were set, I measured and cut a support piece and screwed that to them and the underside of the extension top.
Then I sat back and enjoyed the finished product!


The table itself is 8' long, and 45" wide: the extensions each add 15".
I needed the following materials:
Lumber:
2 x 12 - 4
2 x 8 - 8
2 x 6 - 1
2 x 4 - 12
4 x 4 - 5
Supplies:
1/2 gallon of MinWax Special Walnut stain
1/2 gallon of Arm-R-Seal Urethane Topcoat
1 quart of MinWax Pre-Stain Wood Conditioner
300 2 1/2" screws - I bought the ones from Kreg.
10 3" foam brushes
6 sheets each of 40-grit, 100-grit, and 220-grit sandpaper
Tools:
Miter Saw
Table Saw
Circular Saw
Palm Sander
3 8" C-Clamps
5 quick-grip clamps
3 sets of pipe clamp fittings
3 5' pipes (for the pipe clamps)
2 10' pipes (for the pipe clamps)
Looks Great! What type of wood did you used for the 4x4? Douglas Fir or Pine?
ReplyDeleteI used Douglas Fir, since that was what my local lumber company had available. I'd hoped to find spruce or pine to match the 2x stock, but it turned out okay.
DeleteIt does have a bit more of a reddish tint to it, and the grain is more obviously different colored. Once you've got everything stained, though, it will blend in fairly well.
I've also had trouble finding pine 4x4s and only come across Doug fir. Is spruce a better color fit than the Douglas fir?
ReplyDeletePine and spruce are close enough in color that they fit the fir about equally ...
DeleteIf you're going to stain it a dark color (like I did), they will match pretty well. The most obvious difference will be in the grain (pine and spruce are fairly clear, while fir has a more contrasting pattern). Pick out boards to fit each other, and buy a little more than you think they need.
My dear SIL, you did a wonderful job on the table. My dad thought it was great too. Can't wait to see the next project.
ReplyDeletedid you have any problems with the bench or tabletop warping or twisting at all? I've got a slight twist to mine that i'm not sure how to fix
ReplyDeleteActually yes, I do have a problem with my table top; there is a slight warp in one corner. The best way to avoid this is with some preventative maintenance; give the wood a couple of weeks to adjust to the temperature / humidity level of the house before building the table. If the table is already assembled, you might want to think about using a hand plane or router to shave down the twisted area. Definitely practice before you try it on your table.
Delete