Friday, December 27, 2013

Homemade Vanilla Extract


  Back in April my sister in law Johanna and I endeavored to make vanilla extract. It all started with finding vanilla beans at Christmas Tree Shop. I bought two jars of beans, each jar contained two beans (which I figured was plenty). We then began to read up on making vanilla and asked a few ladies we knew who had done it before and found that you need two vanilla beans for every 8 oz. of vodka.  Johanna bought the smallest bottle of vodka she could find (that wasn't a singe serving) and it was 48 oz. - my four beans were nowhere near enough. So, back to Christmas Tree Shop I went to buy more vanilla beans, bringing our bean total to twelve.

  I measured out 16 oz. of vodka into glass Mason Jars and added  four vanilla beans to that, put the lid on the jars and put them on the pantry shelf in the basement to sit and soak. I pulled them out in November and they were a beautiful amber color and smelled so yummy (and taste great in cookies).


  I saved all the glass bottles the beans had come in, used Goo Gone to remove the labels from the bottles and filled them back up with the finished vanilla to give away as gifts this Christmas. I put half a bean in each bottle - I thought it looked pretty!


  I added labels to the jars before I gave them as gifts, just so people would know what it was. They were quite a hit with everyone I gave them to. I gave them to both my grandmothers (they already have everything they need, and they love to bake so I knew they would use it), they both loved it. I also did a jar for a Yankee Swap we attend, I added a bag of chocolate chips! Who doesn't want to make homemade chocolate chip cookies? It got swapped a few times and I was asked repeatedly how I made it.

  The December issue of Martha Stewart Living had this idea for making Aromatic Extracts. Besides vanilla they did almond and lemon extract, I might have to try that next. That would make a pretty gift - three little bottles of extract?! In the article they only let their extract sit for three weeks, but it seems to me that the longer you left it the better flavor it would have.

  As a side note I later found vanilla beans at Costco for a much better deal, they sell 10 beans for $12. But you don't get the cute little bottles with the beans like I did a Christmas Tree Shop.

How to make Vanilla:

You need -
  * Vodka
  * Vanilla Beans
Use two vanilla beans for every 8 oz. of Vodka. Allow to sit and soak for 2 to 6 months before using.
Enjoy!

Woodsmith #10 Letter Openers


This is one of my Christmas projects - I made a half dozen letter openers for various family members.  The project couldn't be more simple, and I'm very satisfied with the results.  Each piece is unique, and it was a great way to use up some of the small scraps I'd squirreled away from other projects! 

Because I got the plans from a magazine, I'm not posting measurements here, but I'll walk you through the steps. 

Start by cutting three pieces: one long piece for the knife blade, and two identically sized short pieces for the handle. I used contrasting woods (maple and black walnut) for my letter openers, but you can do whatever you want. 


Glue the two short pieces to the back edge of the blade.  If there are any marks or imperfections you don't want showing on the blade, now is the time to hide them behind the handle.  Sanding later will remove most of the surface material, but it might pay off to give some thought to the grain patterns on the handle or blade now. 


Glue and clamp them together and let the glue cure for a good long while.  I left these overnight. 

I am a geek, so I thought of this when I saw this picture. 
Once the glue has cured, you're almost done.

Even though we've already established that I'm a geek, I'll prove it again
I used my new belt sander platform to shape the knives. This was done freehand, so don't worry too much about shape: what you want to do is round the handle's hard edges, sand down the front of the handle so that it curves flush into the blade, shape a point onto the tip of the blade, and then finally sand an edge onto the blade itself.  You can get the knife into whatever shape you want: I made several, so I tried out different ones. I liked the long, thin designs best: the third down is my favorite, followed by the bottom knife. 


Blades facing up so you can see the shape of the handle meeting the blade.


This should give you some idea of the sizes involved:


Yes, those are paper towels.  My shop is in disarray during a remodeling project, so my table saw is my only available work surface and I'm trying to protect it. 

All that's left is to add stain: I used Minwax Natural stain, which is pretty much just deepens the color that is already there.  In the picture below, only the bottom knife has been stained: that should give you a good idea of what it looks like before and after. 


I did a single coat of stain on each side of the knife, then a very thin coat of polyurethane.  

How on earth do you take photos of a letter opener?  No idea.  Hope these do it justice :)


Overall, a pretty simple project: great way to use up some little pieces of scrap wood if you neurotically save them like I do.  

Materials Needed: 
1 - long blade piece (hardwood, tight grain: maple worked for me)
2 - short handle pieces (figured wood, nice if it contrasts)
Glue

Tools Needed:
Table Saw (to rip the thin pieces)
Stationary Sander (could carve)
Clamps

Belt Sander Platform


I can't claim any credit for this particular project - it's lifted almost exactly from a truly fascinating website, ibuildit.ca.  I had some shaping to do for a Christmas project, so I needed a quick way to do some sanding while keeping two hands on the workpiece.  A table-mounted belt sander would be the permanent solution, but this quick stand for my regular belt sander does the same trick for the cost of some scrap plywood, a little hardware, and some 2x stock.

I followed the instructions at this website, with only minor changes.  I didn't go to the final step of creating a fence for the sanding belt, since I didn't need that for my project - that's something I will likely add later on down the road.

To start with, I ripped a 2x2 sheet of 1/2" plywood in half, with one half set aside for the fence (later) and the other half to serve as the platform's base.


Once I had the two pieces equal widths, I cut some spacer blocks and clamped the belt sander between them to mark out the locations for the holding blocks.


I cut dadoes in two pieces of two-by scrap, one on an edge for the front handle and one on the face for the back handle.

Once I had positioned and marked the pieces, I unclamped the plywood sandwich and glued the block into place.


I glued both pieces at once, and let them dry clamped in place.


Once the glue was dry enough to secure the piece, I flipped the plywood over and sank several screws into each block.  Definitely drill pilot holes first, as you're going into some weak grain on the two-by-fours and you don't want it to split.


Once the screws are in, the cradle for the handles is ready to go. The blocks should be positioned so that you can slide the front handle into the long piece, then drop the back handle in to nest into the short piece.


The sander is now cradled, but it's not secured.  In order to lock the sander in place, I needed to add in a tall post next to the rear block. Cut a scrap piece to be just shorter than the handle.


One the post is cut to size, I sliced a groove through the center of the post to hold an inelegantly-named-but-still-useful toilet bolt. A little work with a chisel / drill bit notches out a spot for the head of the bolt - make this parallel to the side, deep enough so that the entire head of the bolt sits in the block of wood.  Position this so that the end of the bolt sticks up at least 3/4", and so that the head of the bolt is less than 1.5" from the bottom of the block.


Now place the bolt in the slot you just cut, then position the post against your handle rest.  Note that the head of the bolt is lower than the handle rest, which means that the bolt will not be able to twist.


Drill a hole in a scrap piece of plywood and add a knob to the top, then tighten the knob to lock the belt sander's handle in place!


Total time - maybe a couple of hours, not too bad!  I'd like to add the fence at some point, and then maybe just spray paint the whole thing, but for a quick project this worked great!

Materials Needed
1 - 12" x 24" plywood (base)
2 - 2" x 4" x 6" scrap (for handle cradles)
1 - 2" x 2" x 4" scrap (for hold-down post
1 - 2" x 4" plywood (clamp arm)
1 - toilet bolt
1 - star knob
8 - 1.5" wood screws
Glue

Tools Needed
Table Saw (for grooves, I recommend a dado blade): chisels could work too, just take longer
Drill
Belt Sander (table wouldn't be much use without one, right?)
Chisel

NOEL Sign - Mantel Decoration


  With all the hustle and bustle of getting ready for Christmas the days have been so filled with parties and baking cookies and making gifts that there hasn't been much spare time to blog, but before the new year is up I wanted to write about my NOEL sign for my mantel. I had pinned this Noel sign from once.daily.chic back in the summer thinking it might come in handy with my holiday decorating. After I put up my Christmas garland and lamps I still felt like the mantel was missing something and I remembered the NOEL sign. I showed it to Andrew and asked if he could make the 'N' and the 'L' and I would take care of the rest. He is a sweet husband and did a wonderful job on them!


  I bought the 'E' at Michael's Crafts. I just went into the section in Michael's that has all the wooden letters and picked the biggest one they had. (They had wooden ones as well as white, but the wooden one was damaged so I went with white.)


  The 'O' I got at Michael's as well. I went in their holiday section looking for a cranberry wreath but didn't fine anything so I got two ropes of berry garland and twisted them together. Its not as stiff as a wreath would be so I had to prop it between the 'N' and 'E' but it worked.


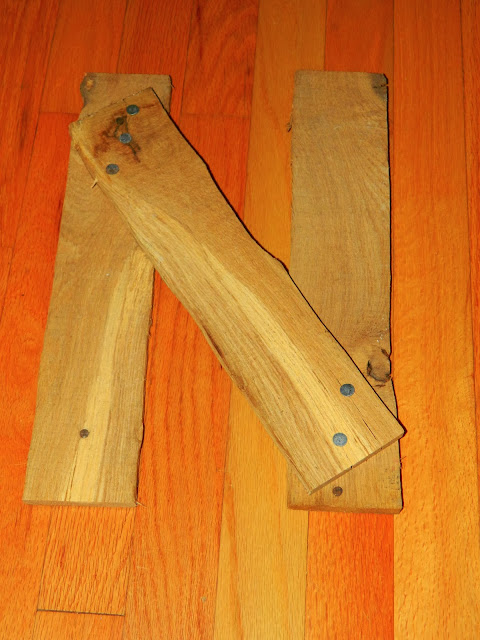
  The 'N' and 'L' Andrew made out of two different pallet boards. I love the fact that they look so different from each other. The 'N' is rougher and has bits of bark on the edge of it, where the 'L' is totally just an old board  - it creates a unique look! He nailed the 'N' boards together with short roofing nails, and used pocket holes and screws to connect the two parts of the 'L'. 
   

  It turned out pretty cute if I do say so my self!

  
And here is my completed mantel - garland, lamps, sign and all! Its quite festive!

Note:
The lamps are from Ikea and cost $5 each. I bought them back in early November.
The tree sign (in the corner of the fire place) I didn't make - I got it as part of a Yankee swap. But it looks super easy to make all you need is a 2 x 4 or some pallet boards, a chop saw, paint, paint brushes, and letter stencils.

Merry Christmas to all!