Tuesday, October 29, 2013

Burlap Leaf Print


  I found this project while I was looking at recipes on Domestically Speaking and thought I knew just the place where it would go. Our mantel is a bit shallow so I'm limited on what I can do on it but we have a piece of Higgins family furniture in our living room which we call "the server" and it had a nice mantel top which I have been having fun decorating.


  I decided to do an oak leaf (she did a maple leaf) so I looked online for a piece of free clip art, put it into Microsoft Word, and enlarged it to fill an 8 1/2 x 11 sheet of paper and printed it out. Then I cut it out, traced it onto freezer paper (which is great stuff) and ironed it on to a piece of burlap that I had cut to fit a frame that I had on hand. I liked the way in her blog the burlap looked roughly cut so I didn't show any care while I cut the burlap. 


 Took it out to the garage to spray paint (I used leftover paint from my Spray Paint Canvas Pillows).


  I let it dry for a bit and then took off the freezer paper and put it in the frame. I covered the inside back of the frame with two pieces of scrapbook paper. I just overlapped them, if you look close you can see the seam but you have to look.


  Then I put it up on the server mantel!


  The mirror came from my grandmother and was in my room growing up; the sprigs of berries I got at a yard sale for $.50. I just added some leaves I bought at Christmas Tree Shop last fall and two pictures of Perrin as a baby - those will get replaced with something more "fall" but at the moment I don't have anything else.


  I love this picture just because you can see a happy little man at play, as well as my awesome server mantel!


  This project didn't cost me a cent. I had the burlap from the Pallet Frame project, I had the spray paint from my Pillows and the frame I had from something or other and it was just sitting in the closet. I'm thinking I might try this framed burlap picture idea again for a different season - not sure for what but you'll have to keep our eyes peeled for something in the future.

Slip Covered Throw Pillow with Burlap Roses


  I had one more throw pillow to make a slip cover for, I followed the directions I found on V and Co: to make the slip cover.


  Here is my slip cover laid out after sewing, just before it was turned right side out and had the pillow stuffed in.


  I had seen Burlap roses and thought that might be fun to add to a pillow so I found a tutorial on Shabby Love and followed her directions. They were very easy to make!


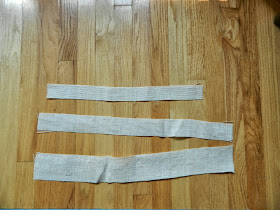
  I cut the burlap to different widths - top one is  1 x 12 the middle is 2 x 18 and the bottom is 3 x 18. I iron the burlap strips before I started the gluing process.
 I found the thicker and longer ones the easier to work with. You just roll and twist and add some hot glue here and there and try to be careful not to burn yourself and in no time you have some burlap roses.


  I added a bit of ribbon I had on hand to the pillow to add to the look!


  I don't think it took me more then a half hour from the cutting of the slip cover to the gluing on of the roses. I think it turned out very cute, a nice addition to my Spray Paint Canvas and Burlap Slip-Sash pillows.

Burlap Slip-Sash Pillow


  While on my pillow kick I decided to try making a couple of slip covers for some of my pillows. I found a tutorial for a easy slip cover from the V and Co: blog (but there are lot of them to be found on Pinterest).
  I got a yard of cloth at Joann's Fabrics for $2.50 on sale - I was pretty proud of my find. I measured my pillow and cut out my cloth to fit.


  Here is the pillow I was covering: it had beads on it so I had to remove them first.


  I hemmed the two back pieces and then pinned them to the front piece right sides together and then sewed them together.


  I had seen a sash-slip tutorial  on Pinterest and I decided I wanted to put a burlap sash on my pillow (I had the burlap left over from doing the back of my pallet frame). I used the grain of the burlap to cut a straight line and then hemmed the two ends so they wouldn't unravel.  I left the sides undone, I just liked how it looked.


  When I got my sewing machine from my grandmother she had given me a bucket of buttons so I dumped them out and found some buttons I liked to add to my pillow.


  I hand sewed my sash and then sewed the buttons onto the sash. Once the sash was in place I stitched it to the pillow.


  Here it is with one of my Spray Paint Canvas Pillows, I love how it looks! It turned out super cute and only cost me $1.25, since I already had the burlap, the buttons and the pillow.