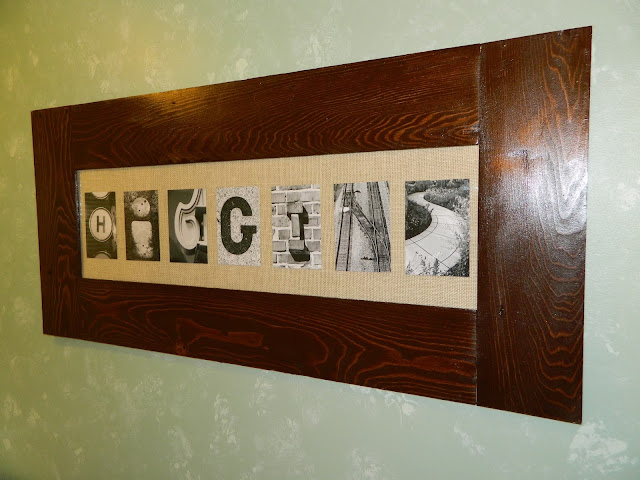
The day didn't come, and the letters never found a place after we moved to our new home. A few months ago, we came across them and decided that building our own frame would be a good way to get a fresh start on displaying these. With the success of some of our other pallet projects, it seemed like a natural fit to use pallet wood to build it!
The final piece of the puzzle came during a July yard sale, when we saw an absolutely hideous poster of disturbing cherubs and sayings loosely related to angels, such as "angels keep the world safe for hummingbirds and butterflies."
While the frame and poster itself were not something we would ever want displayed in our house, the glass in front of the frame was just the right size to cover all of our letters. We bought the whole thing for $.50, brought it home, and took it apart.
With the glass in hand to determine the sizes, I spent a few minutes breaking down, squaring up, and smoothing the boards. We picked a pallet with very wide pieces.
I used my new router table (yes, I was looking for an excuse to try it out) to carve out recesses on the inside edges of the four edge pieces. The glass fit right inside of these.
You can see the lip this created for the glass to rest in in the photo below. Once that was in place, I also cut some wide dadoes on the front edge of the top and bottom pieces, and the back edge of the side pieces. This let the sides meet the tops in a half lap joint (though since I was working with pallet wood, these joints weren't as precise as I had hoped due to differences in the thickness of the wood).
From the front, it looked like the two pieces just butted up next to each other, but you can see from the bottom view that there's actually plenty of gluing surface.
I clamped and glued the pieces together, making sure that the assembly was square and the glass would fit inside.
Then I applied two coats of Minwax Special Walnut and one coat of General Finishes' Arm-R-Seal to the front and back of the frame.
Samantha covered up the front of Our Angels of the Hideous Poster with burlap, wrapping the edge around back and securing it with hot glue spread with a rubber spatula.
Here's a closer view of the end being covered with the burlap.
Because I am neurotic, I spent twenty minutes finding the center of the board, calculating the precise gap between the pictures to end with every photo spaced evenly from each other and the end of the board, then marking the top, bottom, and side positions of each photo with pins.
Once we were happy with the positioning, we attached each photo to the burlap with those sticky dot things that you use to hang papers on the wall. They worked okay, the burlap didn't stick very well but we left some heavy books on it overnight and after that it was fine.
With the photos and backing done, I went back to the frame itself and attached picture wire to the back. After drilling a shallow pilot hole, thread in some short wood screws and then just wind the picture wire tight around the two screws.
I attached the burlap board to the back of the picture frame by stapling the two of them together, with one edge of the stable sunk into the burlap and the other point driven into the frame. I put a ton of staples in, and haven't had any problems. If I need to take the back off, it's not too hard to pull them out and re attach them.
The lighting in the bathroom where we hung the piece is absolutely awful, but hopefully the pictures below give you some sense of how the final product turned out! It's a little big for the space, but we're happy with it and very quickly turned to another bathroom project (more on that in the next post). Every picture we took in the bathroom either had serious glaring or some other lighting issue, so we took some other pictures in different rooms, and even a few outside.
Tool List:
Table Saw
Clamps
Sander
Router (for the half lap joint and the recess where the glass insert was - you could just attach it straight to the back)
Stapler
Hot Glue Gun
Materials List:
Minwax Special Walnut Stain
Arm-R-Seal
Glue
3-4 pallet boards
Glass / Plastic front
Burlap
Sticky Dots
Pins
Picture Wire
2 - short woodscrews


No comments:
Post a Comment