Showing posts with label Home Improvement. Show all posts

Saturday, August 31, 2013

Shelving Crates


After we finished the pallet frame, we decided to check off another item on our to-build list, which would finish off our planned projects for the bathroom downstairs.  Samantha has had her eye on a number of pins for a while now, and we wanted to build some to display odds-and-ends in the bathroom.  This project also helped to balance out the picture frame on the other side, and hide some of the fixtures for our washing machine.

The construction part wasn't actually that complicated!  I think planning and stain took more time than the actual assembly and cutting. Samantha wanted a haphazard stack of crates, so the first thing we did was measure the rough outlines for how much wall space she wanted to use up, and then sketch out the crate arrangement she was looking for.  Then I went back to the measurements and figured out a size for each crate.

Initially, we planned to make the entire crate out of 1x3 lumber.  When I cut and laid out the first crate, though, we very quickly realized that the shelves would not be deep enough to safely display wide items, like mason jars. We ended up using 1x4s as the crate frame instead.

I cut and sanded all the boards right away.  I had already decided on the length and height of each crate, so all I had to do was cut two 1x4s and three or four 1x3s (depending on the final width of the crate) to the crate's length.  I calculated the length of the shorter 1x4s by subtracting the thickness of two boards from the desired width of the crate.


Next, I assembled the frame of each crate.  To do this, I clamped one of the short boards to one of the long boards, then nailed in through the long board's side.


Repeat on the other end of the long board


Isn't the nail gun sweet?  My lovely and thoughtful wife gave it to me for my birthday.  The entire week before my birthday, she kept me from starting this project because she knew I would want to use the new gun to assemble these crates :)


I should have used shorter (1-1/4"?) nails to do this ... but the nail gun came with a box of 2" nails, and I didn't want to run out to the store.  As a result, I had several nails deflect and pop out of the side, and I had to pull them out and re-shoot.

To square up the assembly when fastening the second side, I set my clamps at a bit of an angle (you can't see the other clamp, but it is angled in the opposite direction).  By loosening and tightening these, I was able to change the alignment of the box until it was perfectly square, at which point I drove in a pair of nails.


And now that the box is pinned in place, go back and drive in a few more nails for good measure (and because the new nail gun was fun).


Now that the frame is done, you can add the slats to the back.  Depending on the width of the box and the spacing you want between the slats, the number may vary - I decided to use a consistent slat spacing for all the crates. Find the center of the crate frame, then line it up with either the center of a slat or the center of a space.  The picture below is marked for the center of a slat.


 Nail the center slat(s) in place, then use spacer blocks to lay out the next slats.


On the first side, only put one nail in each slat.  Once you've finished nailing the slats into the second end, you can come back and put in a few more nails.  Doing it this way will make it easier to adjust the spacing on the second end. 


You can see the deflected nails I mentioned earlier: extract these with pliers / hammer and re-shoot.


Doing it this way will almost guarantee that the edge of the slat will not line up with the edge of the frame. If it falls short of the edge but is still close, I left it like that.  If it was sticking out past the edge like in the picture above, I ran it through the table saw with the blade just a fraction of an inch higher than the slat and with the fence positioned to cut just on the outside of the frame.


Here are some shots of the crates being arranged into their final configuration!


To finish off the crates, I used two coats of Minwax Special Walnut (to match the pallet frame already in that room).  That gallon of stain is the same one I bought all the way back during the Farmhouse Table build.


After staining, I wiped on a coat of Arm-R-Seal polyurethane. This is how I get rid of old socks - put on a disposable glove, slip my hand inside the sock, and use the sock as a rag to wipe on the finish.


To hang them on the wall, I found the studs and screwed straight through the back slats into the wall.  Definitely pre-drill the screw holes here - if you drive the screw straight through, you will probably cause a split or two and damage the finish.  Then all you need to do is add decorations!


Tool List:
Miter saw
Nail gun (or just hammer & nails)
Sander
Drill (to mount to the wall)
Clamps

Crate Sizes:
9x22
12x40
10x32
8x18
8x36
10x36

Cut List:
1x3 slats - 36" (7), 32" (3), 22" (3), 18" (3), 40" (4)
1x4 top/bottom pairs - 40", 36" (x2), 32", 22, 18"
1x4 side pairs - 12", 10" (x2), 9", 8" (x2) - subtract the width of your top piece x2 from the initial length of the side piece, so that the with of the bottom piece, length of the side piece, and width of the top piece equal the measurement given here.

Inspiration Sources:
HGTV
My House, My Home
Lilium Designs

Sunday, June 30, 2013

Upcycled Argyle Curtains


 Since our son was born, I've been wanting to make curtains for in his room. My biggest hindrance to making them was my lack of a sewing machine. I had planned to buy one with Christmas money, but when my grandmother learned that I was going to purchase one, she gave me her beautiful antique Singer. She bought it before my uncle was born (60 plus years ago) and sewed a pink blanket for him - she didn't know he would be a boy at that point and was hoping for a girl! Andrew had to order a few replacement parts for it on eBay, but other then that it worked just fine.  Got to love old well made stuff! What sewing I've done has been on older machines, so I felt comfortable using it.

  Before leaving last year to work in Papua New Guinea at a bush clinic, my amazing sister in law Sarah had given me a yard or so of a green, brown and white argyle cloth that she had thought would make beautiful curtains for Perrin's room. It wasn't enough material to make two full curtains, but it looked like enough to make two valances. 

  I also had three brown 54 x 90 inch curtains that had been in the kitchen of our first apartment. Instead of going out and buying new curtains I decided to cut them down to size.


  The windows in Perrin's room were 44 inches long and 31 inches wide.  I wanted the curtains to come to the bottom of the window trim, so I added some length making them 51 and 1/2 inches long.


  I used the 'chalk' from my Ikea sewing kit to help me sketch my measurements to help me cut things to the right length and straight (My coffee cup made a great measuring tape weight).


  Also leftover from our first apartment (and now decorating our downstairs bathroom's only window) I had a valance that I used as a pattern to help me judge the length of the valance. I added a couple of extra inches to the top so I could make a pouch that the curtain rod would go through. I ended up using the pattern of the argyle to help me cut, which made it easy to keep things straight.

  Then came the sewing - I'd forgotten how much I'm not a seamstress! :) My mother is an amazing seamstress and she tried to teach me but yeah.... thankfully I can sew a straight line so I was mostly good! The hum of the machine did bring me back to happy days of listening to my mother sew - that part was nice! I hemmed all four sides and then created a pouch at the top for the curtain rod. I repeated the same thing with the valance.


   Because I didn't want to cover our beautiful window trim, I was limited in what I could use to hang them. I bought two curtain wires from Ikea to hang them with, but that presented me with the issue of having two layers (a curtain and a valance) but only one wire to hang them on. I decided to tack the valance to the curtain. I mostly eye balled it and created pleats (since the valance is much wider then the curtain). I like how it turned out!


  I also made tie back straps. I used the ones from the brown curtains as a pattern and added 9 inches to make them the length I wanted to them to be. 


   Andrew was kind enough to hang the curtain wires for me.


   Now Perrin has curtains in his room and naps much better then before (should have done this a lot earlier). It was a fun little project that did cost me no 'new' money since I upcycled curtains I already had and the argyle cloth was a gift.


Saturday, May 25, 2013

Carpet Squeak No More


Since it's such a rainy day today, I took the opportunity to cross off one of the longstanding items on my to-do list.

The day we brought out son home from the hospital, the floor outside of his room started to squeak.  I swear that when we left for the hospital, they didn't squeak - but the very first time we tried to tiptoe out of his room, the floor made more noise than a nest of baby mice.

A year later, I ran across this video from This Old House, which was showcasing a kit that dealt with squeaky carpets.  The video can do a better job of explaining the process than I can, so head over there for the full details!  Basically, this kit will stop creaky floors, squeaky floors, and noisy floors.  Carpet is easiest, since when you finish everything is hidden, but it can also do hardwood floors too.

Fixing the floor started off with finding the joists.  To do this, the kit includes a pair of long rods with a short section of thread on one end.  Drill that straight through the floor where you think the joists are - if you're right, when you go to reverse the bit out, the drill will rise without you needing to pull it.  If you missed the joist, the drill will spin without backing out of the hole unless you pull on it. Careful - the bit heats up quickly, let it cool down between joist-finding attempts.


Once you've found a joist at one end of your squeaky area, you can measure to the side by sixteen inches (usually) to find the next joist in line.  Check at 16" intervals using your tape measure and the joist finding bit, then drive in a screw a little way to mark the spot.  You'll be changing bits a lot, so either use two drills or a hex bit adapter so you don't have to retighten the chuck every time.


Once you've got two rows of screws outlining the squeaky area, you can fill in the middle sections.  The package recommended driving the screws 4" apart along the joist line, but I went with 8" since I wasn't sure if I had enough screws. Stretch your tape measure between the screws you drove into the joists earlier, so you know that you're hitting a joist.


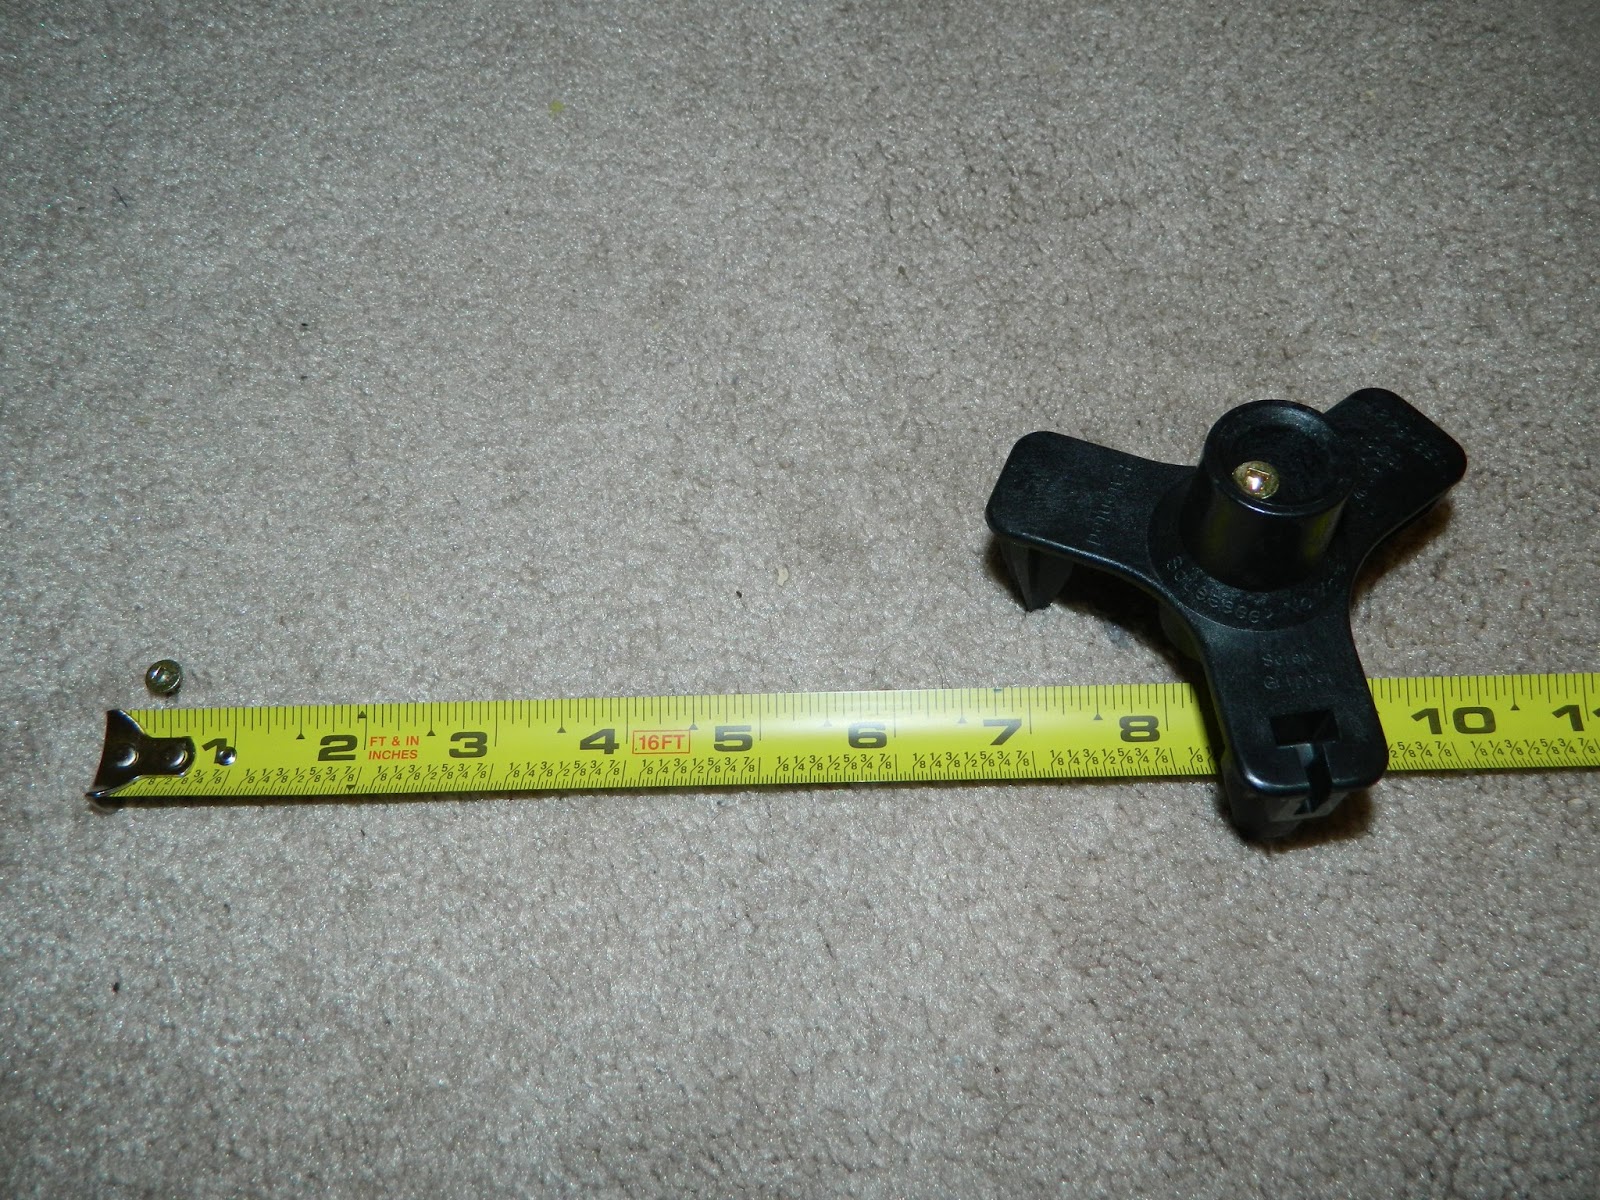
The kit comes with a square driver and a three-pronged depth control fixture, which makes sure you don't drive the screw in too deep.


Using the square driver, drive the screw into the carpet until the stop bottoms out in the depth controller.


When you've driven it in, you'll see that the screw head is sticking up a little bit above the carpet, sure to be painful if stepped on.  Don't worry - they thought of that.


When you are completely finished with the floor, and happy with the lack of squeaks, you can snap the heads off of the screws.  Wait until the very end for this - you don't want to have to repeat all the work finding the studs, and you can see where you've already driven in screws near problem areas.  Test it out by walking around, and when you're finally happy with it, pull out your depth setter again.

See the little cutout on one of the three feet?


Slide that over the head of one of the screws


Give it a twist to the left and right


The top of the screw, which has a weak spot designed in the shaft so it will snap below the surface of your flooring, will snap off.


Snap off all the screw heads in the floor - when you're done, you'll have a nice tidy pile of screw tops.


That's it!  Now that I know it works, I've ordered some more screws to do the other squeaky spots upstairs.  When I'm done, it will sit on my shelf for years - anyone want to borrow it / buy the extra screws in a couple of weeks?  Cheap cheap cheap ...

How do you do a before and after picture of a squeak?  I took a video of the floor before ...


... and another one after.  No squeaks!  I love it ...


Materials for this project: this kit.  Extra screws, naturally, cost extra money - but the fifty that came with this kit were enough for the hall, so I'm happy.  I feel good enough about the project to invest in more screws to do the rest of the upstairs, though I wish they had a 100-count pack, since 250 will be way more than we need.