Showing posts with label Decorations. Show all posts

Sunday, June 1, 2014

Spring Egg Wreath and Mantel

  
For all the projects we have been doing, only a few of them have made it to the blog!  We are finished with a major basement reconstruction, and have a baby due in the next few days, so blogging has unfortunately fallen to the bottom of our list of things to do!  Here's a catch-up post from spring.

Like usual with my projects, it started with a Pinterest search for 'egg wreath' ideas and came across this idea on Crafty Sisters to spray paint Easter eggs to use on a wreath.

  I had a bunch of eggs in my Easter decoration that I had used in the past so I dug those out and then asked Andrew what we had for white or light colored spray paint in the basement (He often will pick up half used cans of spray paint at yard sales for free, and they are great for projects like these). Well, turns out we had two cans of off-white textured spray paint. 


  I laid the eggs out on cardboard and spray painted them. In this picture you see some primary color eggs: I didn't end using those in the wreath because I liked the way the pastel ones looked better. Sadly, that meant I had to go buy another bag of Easter eggs - but they were $2 for 100 at Target.


  I had planned to fleck the eggs with brown or gray to give them a speckled looked but the textured paint gave them a flecked/speckled look all on its own so I just left them.


  I bought a grapevine wreath at Michael's for $5 and hot glue my painted eggs to it!


  It turned out pretty cute, if I do say so myself! :)


   Here is in on my server mantel! The bunting I made for a bridal shower I hosted earlier this year and I bought the pussy willows and green vase at Michael's back in February.  Perrin things it's great to have a "tree" in the house.


 A close up of my pussywillows!


  Here is the link to the bunting pattern I used to make this. I love that you can print out the pattern and choose between four different sizes. I used the 4.5 inch one here, with six different colored papers. I love the way it turned out and have done a couple of different ones since then!


  I like the way my Spring Mantel turned out, simple but cute! (And it only cost me $7).


Supplies needed:
 * 60 plus Easter eggs
 * Grapevine Wreath
 * Textured Spray Paint
 * Hot Glue

Friday, February 14, 2014

Playing Card Garland


  I saw this ideas for Playing Card Garland on Pintrest (where else) and thought "Wow that looks easy and I would be a cute way to decorate for Valentines day!


  So off to Walmart I went to find playing cards (they were $1.99 a pack there). I also bought a pack of quilting fabric to cut the ribbons out of, and I got some white ribbon to hang them on.  In the tutorial I linked above she used ribbon not fabric but the fabric was cheaper and what I could find so I went with that.


  I punched holes in the cards and strung them on the ribbon, I especially liked the way the face cards looked so I tried to space them out along the garland.


  I just cut the ribbon to length and tied loops at each end to hang over the tacks I put up. I bought three decks of cards, made five different strands, and put them up in different rooms in our house!


  The lighting in our bathroom is terrible for pictures but this is on the bathroom window!


  I did a strand across my crate shelves, the pictures doesn't do it justice - its really cute! (Might be my favorite one)!


  Then in the kitchen I did a strand across the bookcase!

 And one at the kitchen window, again the lighting is so bad that I had to use Sepia in my editing software so that you can see it! Note the beautiful snowstorm we are having!


  The largest strand I did was across my server mantel!


  I just had some fun taking different shots of that garland and editing and cropping them!


  Playing card garland is quick and easy and looks really cute for Valentine's Day!

Love Story Pallet Sign and Valentines Mantel


  Putting away my Christmas decorations and wondering what to do next with my mantel is what got me started on this pallet sign. I just started by doing a Pintrest search for "Valentines mantels" to get ideas and I came across this saying "Every Love Story is beautiful, but ours is my favorite." I thought that would be a fun saying to do as the centerpiece of my mantel. So, that lead me to do a search for "Love" pallet signs and these two were my favorites (Link 1) , (Link 2)


   Andrew disassembled an entire pallet for me and let me pick out the amount of boards I wanted.


  I pick these four, one was wider (and turned out to be a different kind of wood) then the other three but I like the way it looked.


  I loved the fact this board had a heart shaped knot on/in it so I had to have it for my "Love sign".

  Andrew put the sign together for me and then I tried the vinegar and steel wool stain idea. It would have been really cute, but because I chose two different size boards that turned out to be two different kinds of woods, the stain turned them different colors. Three boards were more of a tan color and the other was grey. The grey I liked but the tan not so much. Andrew kindly sanded it down again for me and I started again, this time without staining.


  Picking out stencils turned into quite a challenge - finding the right sizes was difficult. I end up finding them at AC Moore Crafts and getting 3 inch New Times Roman and 5 inch Scroll letters. They were all capitals so that changed my sign a bit too. I ended up just using the 5 inch letters on the L, S and O from the words Love, Story and Ours.
  I sketched out the saying first starting from right to left making sure that I had enough room for everything! Then I mixed up some grey paint from some white, off white and black paints I had on hand and started painting. I attached each stencil with photo splits (I use them for scrap-booking) and tape, then painted. Once it was dry (which didn't take long) I'd move to the next letter in the word. It took a few days to finish all the letters but then I do have an almost 2 year old to take care of too!


  Then it was just a matter of adding it to my mantel and getting it centered! I think it turned out pretty nice!


A close up!


  Our whole fireplace and mantel! Side note, this mantel didn't cost me anything! The wreath I made a few years back from roses Andrew has given me over the years. It used to hang in our apartment but since we bought our house I haven't found the right place for it! The heart garland I made last year from scrap-booking paper. The tulle was leftover from a wedding I'd helped with and we brought it home - Andrew had found the bag while cleaning the garage and put it with my stuff and I was looking for something to finish off the mantel and the tulle looked good with it! The candles were free from my grandmother... well since taking these pictures I've replaced them with maroon once that I found at Savers (of all places) so I did spend money on those. Grandma's candles were too glittery for this mantel - I'm sure I'll use them for something else. I put the candles on some birch wood cookies - a friend of mine was given a bunch of birch logs and asked if I wanted some to use for crafts or decorating and this was the first idea I had to use them.


  Happy Valentine's day to all!

Monday, January 6, 2014

Burlap Africa Print


 Back in September I made a Burlap Leaf Print for my server mantel, it was a super easy project and something I knew I would try again. While thinking about Christmas gifts and what to make different people in my family I came up with the idea of doing a burlap print of Africa for my brother and his wife, who are in the process of adopting from the country of  Uganda.  If you have ever been to any African country it doesn't soon leave you. What the people are like, the climate, the culture - its amazing! Everyone is excited for this child to join the family, so I figured a burlap print of Africa with a heart over Uganda would be a special gift.

  I bought a black frame at Ikea (took the mat out), used a piece of brown scrapbook paper for the back ground and rough cut a piece of burlap to fit inside the frame (I'm still using the burlap I bought to do the Pallet Frame we made back in August). I just Googled Africa and looked for a good piece of clip art, sized it and printed it out.


Ikea frame, burlap, scrapbook paper and Africa template.

 
Rough cut burlap.


  Getting ready to trace my African template onto freezer paper.


  Once your template is traced you have to cut the inside out, I just used scissors and cut slowly. Then you iron the template to the burlap, I also ironed the little heart I had cut out at this time too. Then off to the garage to spray paint. I just used some black spray paint that I had on hand - I thought about using a different color but somehow the black frame with the brown paper and burlap made black seem the the right paint for the project. I'm glad I chose it but it turned out awesome!


  The sky is the limit with this project - you could do anything and I'm sure you'll see more burlap prints from me1

Friday, December 27, 2013

NOEL Sign - Mantel Decoration


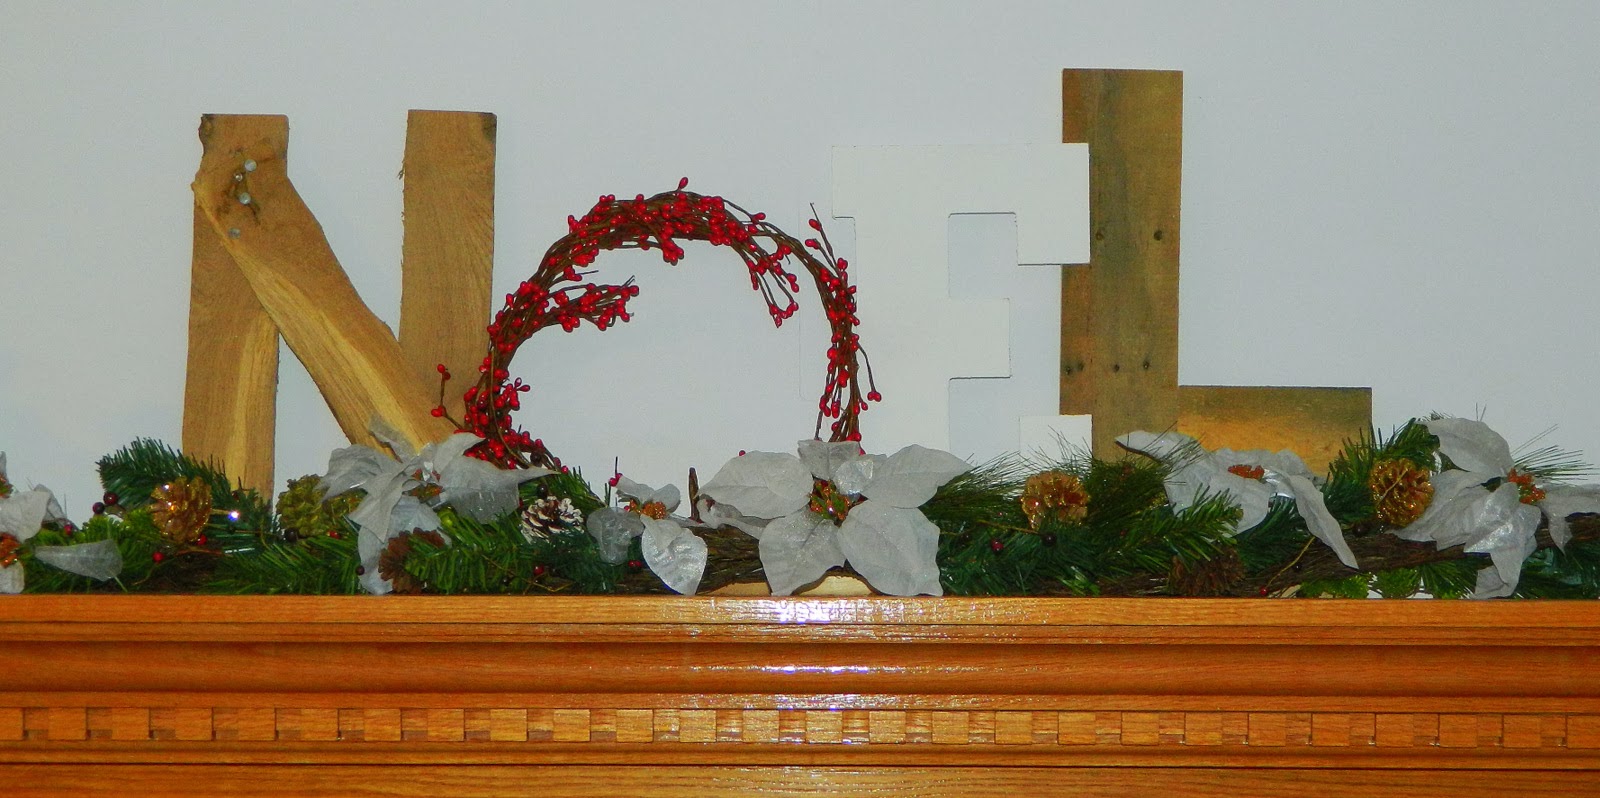
  With all the hustle and bustle of getting ready for Christmas the days have been so filled with parties and baking cookies and making gifts that there hasn't been much spare time to blog, but before the new year is up I wanted to write about my NOEL sign for my mantel. I had pinned this Noel sign from once.daily.chic back in the summer thinking it might come in handy with my holiday decorating. After I put up my Christmas garland and lamps I still felt like the mantel was missing something and I remembered the NOEL sign. I showed it to Andrew and asked if he could make the 'N' and the 'L' and I would take care of the rest. He is a sweet husband and did a wonderful job on them!


  I bought the 'E' at Michael's Crafts. I just went into the section in Michael's that has all the wooden letters and picked the biggest one they had. (They had wooden ones as well as white, but the wooden one was damaged so I went with white.)


  The 'O' I got at Michael's as well. I went in their holiday section looking for a cranberry wreath but didn't fine anything so I got two ropes of berry garland and twisted them together. Its not as stiff as a wreath would be so I had to prop it between the 'N' and 'E' but it worked.


  The 'N' and 'L' Andrew made out of two different pallet boards. I love the fact that they look so different from each other. The 'N' is rougher and has bits of bark on the edge of it, where the 'L' is totally just an old board  - it creates a unique look! He nailed the 'N' boards together with short roofing nails, and used pocket holes and screws to connect the two parts of the 'L'. 
   

  It turned out pretty cute if I do say so my self!

  
And here is my completed mantel - garland, lamps, sign and all! Its quite festive!

Note:
The lamps are from Ikea and cost $5 each. I bought them back in early November.
The tree sign (in the corner of the fire place) I didn't make - I got it as part of a Yankee swap. But it looks super easy to make all you need is a 2 x 4 or some pallet boards, a chop saw, paint, paint brushes, and letter stencils.

Merry Christmas to all!